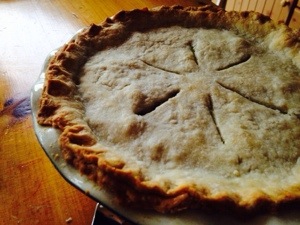
Yesterday I was kind of in a rut with what to fix for supper. The winter doldrums. Not another meatloaf…just had pizza…my spaghetti has been lacking… Sometimes I find that when I am stretched the thinnest on ideas, something happens, and it just comes together. My first thought was quiche. But then I remembered we’d already had eggs at lunch plus potato salad. Ahhha! Pot pie. That’s a good hearty winter meal and I had cooked sausage I wanted to use up. Good ‘ol Betty Crocker helped me out with the pie crust. Her’s is so easy…although probably not the healthiest… I also used her Pot Pie recipe as a guide. Now making a pot pie is not all that profound, but here’s where I congratulated myself. I had saved some of the discards from some kale we had just juiced the other day. I saved it because I felt bad throwing it away but I had no idea what I was going to do with it. It was probably just going to sit in the fridge for a week, grow some mold, and then I’d toss it out without feeling as bad. Now Tony is my vegetable watchdog. I might “forget” about vegies every once in a while, but not Tony. Supper MUST have a vegetable. So on a stroke of genius I tossed in the already minced kale. Waalaa! It turned my pot pie filling a lovely shade of green. Spring green. ahhhhh… I grabbed a spoon and held my breath as I tried the filling thinking that we might have to choke this supper down. Oh my stars! It was wonderful! A beautiful moment in the kitchen. The highlight of a stay-at-home mom’s day…successful meal. 😉

With the leftover pie scraps I decided to make a mini cinnamon pie for dessert. I knew the boys would LOVE it and it brings back fond memories of when I was dating Tony, and his mom would pull one from the oven. (A visit to the boyfriend’s house always included something over-the-moon wonderful to eat!)
I’m not sure if it is a made-up family recipe or not, but next time you have pie scraps, give this one a shot. (I meant to take a picture of it, but it was gobbled up before I thought of it.)
Press your leftover pie scraps in a small pan…maybe like an oven safe container that can hold 1-2 cups… You could also do several small ramekins for individual servings. Place 1/4 cup sugar in the crust filled pan. Add 1/2 tsp cinnamon and stir it gently without jabbing your crust. Fill the crust up with cream or half and half, or whole milk. Stir it up gently. Taste it for sweetness. Throw it in a 425 degree oven and cook for about 25-30 minutes until golden and bubbly. Eat it straight from the pan. It’s like sweet milk with gooey crust… oh man…
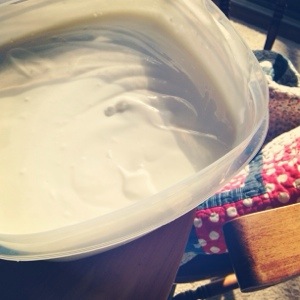
I also have heard several of you are making homemade yogurt! Yay!!! It’s so wonderfully easy and makes you feel like a million bucks that you actually made yogurt. Here’s an instagram pic I took of the batch I made a couple days ago.

Here’s the recipe.
In a crockpot, pour 1 gallon of milk. Doesn’t seem to make much of a difference between skim–whole milk…anything goes.
Cook on high for 3 hours. (I typically start a batch at 2-3:00 the day before.)
After 3 hours, turn your crockpot off. That’s it.
After the 3 hours off, scoop out about 1 cup of the warm milk, and add to it 1 small container of yogurt. (I don’t think brand really matters. You are after the cultures in it. I like to use vanilla since it is more flavor neutral.)
Pour the milk+yogurt back into the crockpot and whisk a bit so the yogurt is distributed.
Wrap your crockpot in towels and blankets and leave overnight. (Remember your crockpot is OFF! It has been off for 3 hours.)
In the morning, you will want to strain your yogurt. My method for this is a pot with a colander set on top. A flour sack dish cloth set in the colander. Then scoop all your yogurt and whey from your crockpot and place in towel in colander. The whey will go though the towel and colander and collect in the pot below. The longer you strain the thicker your yogurt. I think I strain for about an hour.
If you have any lumps at this point…which I think has to do with temperature…you can easily whisk them out for smooth creamy yogurt.
Add some sugar to taste. Add vanilla to taste. I like this combo because then I can add berries and granola when we eat it.
Some other ideas for add-ins:
maple syrup
honey
fruit (frozen, dried, fresh)
rhubarb jam
Now, what to do with all that whey??! Make BREAD! Or use it in smoothies… It’s high in protein and good for you!

So with my hot new crockpot I can’t do 3 hours, I have to do 2 hours 40 min. You don’t want the milk to boil. Just a little tidbit I have learned. Thanks for blogging this Ingrid, I just tell everyone to go to your website.
AWESOME. I cannot even BELIEVE how easy homemade yogurt is?! I thought it was this big involved process, which is why I have been scared to look in to it! You just made my day! I am going to try it this week!
Oh! Two questions, do you save the whey for anything? Can you reserve a cup of the homemade yogurt to make the next batch?
The hardest part is not forgetting about it Naomi! Set a timer. Trust me. 🙂 I save the whey for all my bread making. I linked the recipe I use weekly in the post. I have tried using it for other baked goods, but have not had much luck. I think anything with baking soda or baking powder does not react well with the whey…not sure why. But basic yeast bread works beautifully. I have heard of others using it in smoothies and even drinking it plain.
You can use a cup of the homemade for the next batch. I have not done it much. Mine usually gets eaten before I remember to save some. It also gets pretty tangy after a week-2 weeks…which may or may not be just fine…
Let me know how it goes!! And ask more questions if you get stuck!!
Out of a gallon of milk, about how much does it make?
Out of a gallon of milk, I think I get about 5-6 cups of whey and 8ish cups of yogurt… Maybe about 2.5-3 of the large yogurt containers you can buy.